Search This Website

Showing posts with label Computer Tips. Show all posts

Wednesday, August 21, 2019

How To Access Blocked Websites?

How to unblock blocked websites


1. Use VPN for unblocking
VPN (Virtual Proxy Network) allows you to connect your device to a secure connection to another network over the internet. Thus, it enables you to access blocked websites from your home network and puts your IP address in a land far away. You can also download the apps, open the sites blocked in your country, or use it as a way to unblock sites in school.

VPN acts as a tunnel that converts your data into garbage value that’s difficult for anyone to sniff and recognize. There are tons of free/cheap VPN services that one can use and enjoy an uninterrupted internet experience.

Check out our detailed article on what is VPN and how it works. Here are some great VPN packages for you to try —

· PIA (Private Internet Access)

· ExpressVPN

· NordVPN

How to unblock a blocked website using the built-in proxy in Epic web browser
Epic Privacy Browser has a built-in encrypted proxy.

You can download Epic Privacy Browser here.

1. Open Epic Privacy Browser.

2. Click on the red plugs icon located at the top right of the browser.

3. Click on the On button.

4. Select a location.

How to unblock a blocked website using proxy sites
A proxy site is a website hosted on a server that redirects your web browsing activity. A proxy site acts as an intermediary between you and the website you want to visit.

You can use proxy sites to access blocked websites.
1. Visit any of the proxy sites listed below.
https://www.hidemyass.com/proxy
https://www.proxysite.com
https://proxysite.site
https://unblockwebsites.net
https://hide.me/en/proxy
https://kproxy.com
https://hidester.com/proxy/
https://whoer.net/webproxy

2. Enter the URL (web address) of the website you want to unblock (e.g., www.reddit.com, www.spotify.com, etc.).

3. Press Enter.

HOW TO CREATE RESTORE POINT IN WINDOWS 10 ?


Note: Some companies, schools, or countries block proxy sites, and they might update their list of proxy sites regularly, so you might want to make a list of proxy sites.
How to find a website's IP address using an online service

1. Visit any of the online services listed below.
https://www.site24x7.com/find-ip-address-of-web-site.html
https://ipinfo.info/html/ip_checker.php
https://www.iplocation.net
https://tools.keycdn.com/geo
https://whatismyipaddress.com/hostname-ip

2. Enter the URL (web address) or domain name of the website (e.g., reddit.com, www.spotify.com, etc.).

3. Press Enter.

The group of numbers is the IP address of the website (e.g., 185.60.218.35).
How to find a website's IP address using Windows Command Prompt

In this example, I'll be using Facebook.
1. Open the Windows Command Prompt.

2. Type the following command:
ping facebook.com


3. Press Enter.

The group of numbers is the IP address of the website (e.g., 185.60.218.35).

How to find a website's IP address using the Mac OS X Terminal
1. Open the Mac OS X Terminal.

2. Type the following command:
ping facebook.com


3. Press Return (Enter).

The group of numbers is the IP address of the website (e.g., 185.60.218.35).
How to find a website's IP address using the Mac OS X Network Utility

1. Open the Mac Network Utility.

2. Open the Ping tab.

3. Type the site's domain name (e.g., facebook.com, twitter.com, yahoo.com, etc.).

4. Press Return (Enter).

5. Set the number of pings to 1.

6. Click on the Ping button.

The group of numbers is the IP address of the website (e.g., 185.60.218.35).
How to unblock a blocked website using a URL shortener

Maybe the URL (web address) of the website you want to visit is blocked, but converting the URL to another shorter URL with the help of a URL shortener might help you access the blocked site.

1. Visit any of the URL shorteners listed below.

https://windscribe.com/securelink
https://bitly.com
https://tinyurl.com
https://mcaf.ee
https://shorte.st
https://bit.do
https://tiny.cc

2. Enter the URL (web address) of the website you want to unblock (e.g., www.reddit.com, www.spotify.com, etc.).

3. Press Enter.

The URL shortener will now create a custom short URL, and this URL can be used to visit the blocked website.

Now Watch:
#UnblockWebsites2019 #OpenBlockedWebsites

TAGS
  
Tech News  Facebook Tips  

To Get Fast Updates Download our Apps:Android||Telegram

Stay connected with us for latest updates

Important: Please always Check and Confirm the above details with the official website and Advertisement / Notification.

Friday, September 21, 2018

Top 5 Best FREE Photo Editing Software (2018) for Windows PC, Mac & Linux


If you’re looking for top best free photo editors 2018 and you don’t want to purchase expensive software like Photoshop, you have many choices. Today, in this post, I will tell you the top 5 best free photo editing software of 2018 or top best Photoshop alternatives 2018 for Windows PC, Mac & Linux that you can use for free on your computer. Each of these programs can perform the basic tasks of enhancing your photos to make them look amazing. Some of these include advanced features similar to Photoshop that should satisfy your image creating and editing needs.

Top 5 Best FREE Photo Editing Software (2018) for Windows PC, Mac & Linux


5. Photoscape – Easy to Use Free Photo Editing Software


It has tons of features to enhance your photos. There are filters, effects and tools to transform your image. You can also create animated gifs, collages and has several backed options for working with multiple images. When you launch Photoscape, it shows you most
of the tools that you can use along with tutorials. When editing your photo, you’ll find all the tools in the upper right just like the other programs that I’ll tell you. It’s just a matter of trying out the different tools to make everything perfect. Photoscape is free and they do offer a pro version with extra features for around $40. But for most people the tools available in the free version will be all that they need. If you’re running Windows 10 or on a Mac you will want to install Photoscape X, for older Windows operating systems you will want to select the link for Photoscape 3.7


Krita is a free and open source program, designed primarily for digital painting and animation purposes. So it has a higher learning curve than the others mentioned. There are plenty of features available for image editing such as brushes, masking tools, filters, effects and many more. With the program open, you’ll find most of the tools you’ll be working with along the left. On the right is the advanced color selector, along with the
ability to quickly add new layers. Pressing the tab key on your keyboard, enlarges your image, getting rid of these sidebars, giving you more space to work with. If you need help learning how to use their program, they offer tutorials on their site. Krita is available for Windows, Mac and Linux.


3. Pixlr – The Best Free Server Based Photo Editing Software


Pixlr offers server based software that can be run inside your web browser without the need to install a program on your computer. Two of their web apps that are recommend are, Pixlr editor and Pixlr Express.
Pixlr Express is an easy to use photo editor like Photoshop Express. Along the bottom it offers several adjustments including crop, resize, color, red-eye and several others. There are some cool effects, overlays, borders, stickers and the ability to add text to your image. If you want to quickly edit your photos I would recommend using Pixlr Express over Pixlr editor. But if you want more tools at your disposal, I would recommend Pixlr editor.
In Pixlr editor most of the tools are on the left along with extra tools found in the menu bar and you have the ability to add more layers on the right. If you prefer to work with server based programs, Pixlr editor and Pixlr express are both excellent choices for editing your images without the need to download any software.


2. Paint.net


It was created many years ago as a more powerful alternative for Microsoft Paint. Even though it’s not as feature-rich as Photoshop or the number one pick in this post, it does
feature a solid set of advanced tools including layers, filters and effects that will give your image a whole new look. You can also download plugins to add new effects, adjustments and file types to paint.net that were created by the community. Paint.net is available for
Windows 7 or newer and it can be downloaded for free with the option to donate to
the developer on their site. You can also support the developer by purchasing it from the Windows Store.


1. GIMP – The Best Free Photoshop Alternative


GIMP is the absolute best free image and photo editing software that you can get. This open source program was initially released in 1996 and is packed with features often found in expensive software. There’s a massive set of tools on the left in the toolbox. On the right, you can find your layer and brush options. In the menu bar, there are a lot more settings that you can mess with. If you want to get rid of the multiple floating windows to have everything in just one window, simply select windows and at the bottom of the drop down menu enable single window mode. It’s advised when learning to use GIMP that you watch tutorials. There’s some available on their site and several good ones can be found on YouTube. GIMP is available on Windows, Linux and Mac.

if you’d like to recommend a photo or image editor that is not mentioned here, let us know
about it in the comments below.


To Get Fast Updates Download our Apps:Android||Telegram

Stay connected with us for latest updates

Important: Please always Check and Confirm the above details with the official website and Advertisement / Notification.

Saturday, September 15, 2018

How to Clean Your Windows PC to Make it Faster

We all know that Windows PCs become slower over time and while some of it has to do with the aging hardware, how you have treated your PC in the past years also plays a big part in it. Since the launch of Windows 10, the operating system has become better at managing itself, however, there are still certain steps that you can take to rejuvenate your PC’s performance and get a couple more years out of it. So, if your PC is slowing down or crashing on you from time to time here are some of the steps that you can to clean your PC and make it faster:


Clean Your Windows PC and Make It Faster


1. Disk Cleanup

Over several months and years of usage, your computer tends to accumulate junk files which not only take up storage on your system but also play a big role in making the overall system slow. To make sure that your storage is running in optimal conditions and there are no junk files unnecessarily taking up room on your hard drive, you must perform disk cleanup from time to time.

Fortunately, Windows 10 allows you to easily perform this action with just a couple of clicks. To start disk cleanup of your Windows PC, first, right-click on any drive in file explorer and then select “Disk Cleanup” under the General tab. When you do that, a window will pop up showing the types of file this process will be targeting. Normally, the process targets files including system memory dump files, temporary internet files, and cache files among other things. Just review the things that you want to delete and hit the Ok button to confirm the cleanup process.


2. Stop Unnecessary Start-up Loading Programs

If your PC takes longer than usual to boot up, one of the reasons behind this delay might be the start-up loading programs. These programs are basically software which you have knowingly or unknowingly given permission to launch when your computer boots up. Since all these programs launch at the same time they put a lot of strain on your computer and cause it to load slowly. To make sure that you don’t have any unnecessary program starting up when your computer boots up, you will need to revoke the start-up permission given to those programs.


To do that, first, use the Ctrl+Shift+Esc key combo to launch the Task Manager utility. Here, click on the Startup tab where you will find the list of apps which have been given permission to launch at startup. Here, disable the programs that you don’t want to launch at startup. On Windows 10 devices, you can also go to Settings -> Apps -> Startup, and disable apps from there. If you find any program that you are not sure about, it’s better to leave it be as it can interfere with the bootup process.


3. Uninstall Unwanted Applications

This step is basically common sense, however, I am still amazed by the number of people who keep tens of apps installed when they know that they are never going to use them. Not only these apps take space on your computer, they might also be hogging up all the RAM and processing power in the background. That’s why it’s a good practice to check and uninstall unwanted apps every once in a while. If somehow you still don’t know how to uninstall apps on Windows 10, just open Settings and click on Apps. Here, click on the app you want to remove and then click on the Uninstall button.


4. Disable Background Apps

Another thing that should do to make your PC feel swifter is disabling background apps. Most of the times we don’t know how many apps are running in the background and eating up our system resources. The background apps are one of the biggest culprits behind the slowness of our computers. To find out the list of apps running in the background and disabling them, go to Settings -> Privacy, and scroll down to find the Background apps option. Click on it, and then disable the apps that you don’t want eating up resources.


5. Diagnose Problems and Perform System Maintenance

While all of the above steps can be performed by any normal user, this step does require a bit of technical know-how of the Windows operating system. Even then, I normally don’t suggest users carry out the system maintenance all by themselves as there are a million things that can go wrong at any time. Personally, I trust Windows’ problem diagnosing and maintenance processes with a proven third-party app which can perform these actions with just click of a button, and my favorite tool to do that is the Auslogics BoostSpeed.

The app runs a complete checkup of your entire system locating junk files, speed-reducing issues, and causes of any system or application glitches or crashes. Once these issues are found, you just need to click on the Resolve All button to solve the issues. One of the best things about this app is that you can automate your OS maintenance. Basically, you can schedule automatic maintenance that detects and eliminates issues in real time. This feature allows me to forget about manually checking the status of things like junk files, system problems, application failure, and more as BoostSpeed automatically takes care of it all for me.
Not only that, if you buy the full version of the app, you can perform most of the other actions mentioned in this list using the app itself. So, whether you want to manage startup items, defrag your disk, clean Windows registry or do any task which potentially improves your PC’s speed, Boostspeed can do that in seconds. Basically, this is the only app that you need to keep your PC in the best possible shape. While the app costs $59.95, there is a free version which you can install by clicking on the link below. If you do decide to buy this app, use our link to get 30% off of its price.


6. Defrag your Hard Drive

If your computer is using a solid state drive, also known as SSD, you don’t need to carry out this task, however, if it uses a spinning hard drive, you need to defrag it from time to time to make it faster. The reason behind this is pretty simple. Over time, files on your hard drive get fragmented, and your computer slows down because it has to check multiple places on your drive for those pieces. What defragmenting does is rewrite all the files in a sequential manner so it is easier and faster for your hard drives to access those files.

Now that you know what defragging means, let’s see how we can do it. First, open the disk optimization tool by searching for the term “defrag” in the start menu. Now, click to select the drive you want to defrag and click on the Analyze button. Now, your computer will do its job and come up it with a result which will show you the percentage of fragmented files on your system. While there is no hard and fast rule about defragging, but as a rule of thumb, whenever that number goes above 5%, you should certainly defrag your hard-drive.

7. Change Power Setting to High Performance

By default, every Windows computer is running on “Balanced” power mode which basically means that the Windows operating system is managing performance and battery life. However, if you ever feel that your computer is getting slow and you are ready to sacrifice some battery life to improve performance, you should change the power setting from Balance to High Performance. To do that, go to Control Panel -> Hardware and Sound-> Power Options -> Create a Power Plan and then select the High-Performance setting and create it. While your computer’s battery life will suffer a little bit, you will be getting the best performance out of this.

Revitalize Your PC With These Performance Tips

If you carry out all the above-mentioned steps, you will see a significant boost in your PC’s performance. I have been using these steps to speed up the computers of my friends and family and every time I see a nice boost in both start-up and usage speeds of the PC. Just try them out and you will be surprised by the results. Also, let us know how speedy your computer got by writing in the comments section below.


To Get Fast Updates Download our Apps:Android||Telegram

Stay connected with us for latest updates

Important: Please always Check and Confirm the above details with the official website and Advertisement / Notification.

Sunday, July 15, 2018

HOW TO FORMAT PENDRIVE USING CMD ?

Formatting is a valuable and essential tool when dealing with any type of storage disk and can help to solve a lot of errors and headaches. But what do you do if your USB flash drive needs to be formatted but, every time you try through the property menus it comes up with an error, or won’t even recognise the drive properly at all. Don’t despair because here is something you can do.


 pendrive using cmd  is a common process that may need to be undertaken quite frequently, but unless you have gone through this procedure before it can be a mine field. The last thing you want is to finish the process and end up with an unusable pendrive . Here is a quick step by step guide to Format pendrive using cmd


STEPS TO FORMAT PENDRIVE USING CMD


This guide formats your flash drive as FAT32, to format as NTFS simply substitute the term in the command box. FAT32 is the recommended formatting style by this guide but many do prefer NTFS. Follow the Below steps to Format an unformatable Pendrive.
Step 1. Turn on computer as normal
Step 2. Once you are in your desktop insert Pendrive into USB port
Please note: if you know the letters associated with your disk locations or can use a utility such as disk part to list this information then skip steps 3 and 4
Step 3. Go into my computer (accessible from the start menu or desktop) and look down the navigation panel on the left hand side, this lists down to the popular and root menu folders and locations on your computer.
Step 4. Your Pendrive should be listed in one of these locations, it may be referred to by brand, as portable storage or something similar. Next to this label will be a letter,
for example G: removable storage device ” if the device does not show up you may need to test the port to find the letter with another USB device. This letter needs to be written down or remembered in order to complete this process.
Step 5. Go to the windows start menu, click start or the Windows symbol depending on your edition of Windows, then click run.
Step 6. Type cmd into the run dialog box and click OK, this is to start the command prompt window from which you will be able to choose your format style and name your drive.
Step 7. Then the command prompt window is opened and you will need to type ” Format G: ”


if you want to Format it as FAT32  then type ” Format G: /FS: FAT32 ”

Step 8. The G in this instance refers to our example Pendrive location, instead you would enter the letter that you remembered or wrote down from the my computer side panel
After you have typed the above command press enter.
Step 9. Here, you will be asked to press enter again and then to give a name for your drive. Follow these prompts then click on enter again.
You have completed the process of Formating pendrive using cmd; go back into my computer to check that the formatting has been completed successfully.


To Get Fast Updates Download our Apps:Android||Telegram

Stay connected with us for latest updates

Important: Please always Check and Confirm the above details with the official website and Advertisement / Notification.

Saturday, July 14, 2018

HOW TO CREATE RESTORE POINT IN WINDOWS 10 ?

Having your PC compromised in any way can be damaging and can cause a lot of stress for you. Simple tasks such as installing a new app, driver, or update can create issues with your computer, and you may want to undo the changes you made to revert your PC back to normal. This is where creating a restore point in Windows 10 can be beneficial for you.
Restore Point allows you to essentially save a ‘snapshot’ of your computer at a given moment which is then stored as a restore point. If your computer Somehow starts working awkwardly or becomes laggy, you can then revert to this restore point that you saved and your PC will go back to how it was at that time.


IMPORTANCE OF CREATING RESTORE POINT IN WINDOWS 10 PC


Most of us had encountered a problem here or there with Windows before and wished that we could undo changes and bring back our PC to how it was before. By creating a restore point on a Windows PC, you can effectively bring back your computer to a previously saved state if you think that its current state is compromised.
So you are basically going back in time to how things once were instead of your PC operating in its current capacity that you’re unhappy with. It should be noted that if you have installed any programs after a restore point has been created, that once a restore is performed those programs will not be there anymore.


HOW TO CREATE A RESTORE POINT IN WINDOWS 10


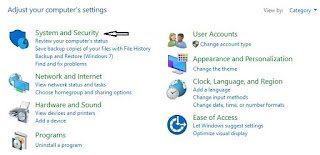
Step 1: Open up Control Panel on your PC. You can access it by either using your computers built-in search function, through the Quick Access Menu, or by using Cortana


Step 2: Open up the System and Security section and then click on System. Now from the left pane click on System Protection.


Make sure that the Windows Drive (usually C)has Protection set to On by selecting the drive and clicking on Configure.
Step 3: Click on the Create button to create a system restore point. You can write a description so that you can remember in future why this restore point is important to you.

HOW TO USE A RESTORE POINT IN WINDOWS 10


Step 1: Open up Control Panel on your PC as mentioned above.
Step 2: Go into the System and Security section then open up System Protection.
Step 3: Click on System Restore, and you will see a list of available restore points to choose from.
Step 4: Click on Next and then Finished to begin a system restore.
That is it Folks, you just learned how to Create a restore point on your PC. If you do not have restore point created already, then you should go ahead and Create one just now. You never know when a program or system files can make your computer behave like it is good for nothing.
Having a Restore point can help windows users, and you always have an option to take your PC back in time when your System was working like butter.


To Get Fast Updates Download our Apps:Android||Telegram

Stay connected with us for latest updates

Important: Please always Check and Confirm the above details with the official website and Advertisement / Notification.

Our Followers

Popular Posts

Any Problem Or Suggestion Please Submit Here

Name

Email *

Message *